Oracle has recently released updated MySQL connector for .Net core. In this post we’ll see how to connect to a MySQL database with asp.net core application. We’ll use Entity Framework core to communicate with MySQL database.
Create a new asp.net core web application without authentication.
First thing we’ll do is to add our database details in application. For that we’ll add database connection string in appsettings.json file. Add it like this way:
{
"ConnectionStrings":
 {
    "SampleConnection": "server=localhost;userid=root;pwd=password;port=3306;database=test;sslmode=none;"
 }
}
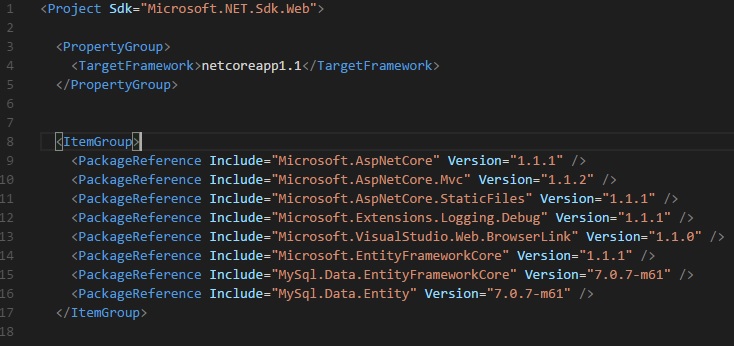
Now add Entity framework core and MySQL references to the project’s .csproj file. Add following references:
If you are not using visual Studio and running from command line, then you need to restore the packages by running commang dotnet restore.
Add Model folder in the application if it’s not created. Here we’ll create a database context for Entity Framework. Create ApplicationDbContext.cs class inside the Model folder with following code:
using Microsoft.EntityFrameworkCore;

namespace WebApp
{
    public class AppDBContext : DbContext
    {
        public AppDBContext(DbContextOptions options): base(options){
            this.Database.EnsureCreated();
        }

        public DbSet Course { get; set;}
    }
}
Create course.cs file inside Model folder with following code.
namespace WebApp
{
    public class Course
    {
        public int Id { get; set; }
        public string Name { get; set; }
    }
}
Now let’s configure the application to use MySQL database. So inside startup.cs file ConfigureServices method, add these lines:
services.AddDbContext(options => options.UseMySQL(configuration.GetConnectionString("SampleConnection")));
Now let’s code to enter and show the details of Course table. So in Homecontroller add following Action methods to create and show the courses:
        public IActionResult Courses()
        {
            var list = _context.Course.ToList();
            return View(list);
        }

        public IActionResult Create(){
            return View();
        }
        [HttpPostAttribute]
        public IActionResult Create(Course model){
            if(ModelState.IsValid){
                _context.Course.Add(model);
                _context.SaveChanges();
            }
            return RedirectToAction("Courses");
        }
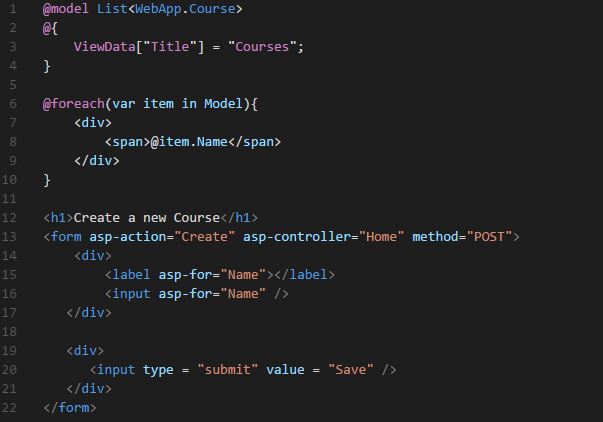
Database interaction part is completed. Now we’ll views for these new action methods. For showing all courses add a view file named Courses.cshtml with below code:
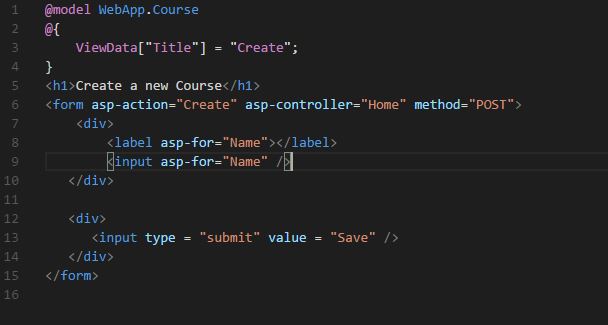
Add Create.cshtml file with following for entering new courses:
You can see all the courses at home/courses.
Be First to Comment